WHY You’ll Love This Recipe
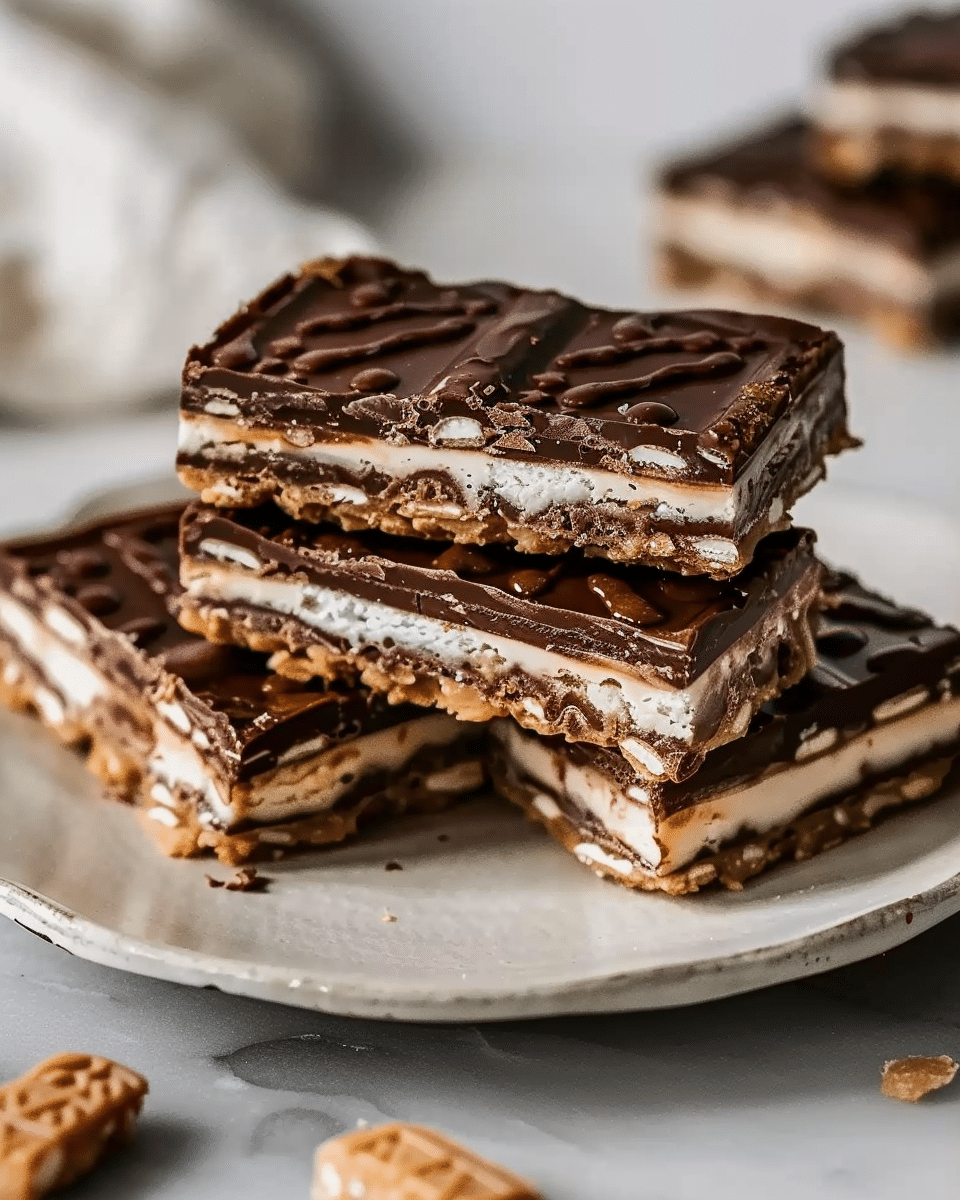
Homemade Kit Kat Bars bring the same crunchy, chocolatey goodness of the store-bought version but with a fresher and more customizable flavor. The combination of crispy wafer layers and smooth chocolate is addictive, and making them at home means you can adjust the sweetness or chocolate type to suit your taste. Whether you prefer dark, milk, or white chocolate, this recipe is simple to prepare and great for sharing at parties, as a snack, or as a fun baking project with the family.
Ingredients
- 2 cups of milk chocolate chips (or dark chocolate, if preferred)
- 1 1/2 cups of crispy wafer cookies (you can use plain wafers or wafer sticks)
- 1/4 cup peanut butter (optional for a twist)
- 2 tbsp vegetable oil (to smooth out the chocolate)
(Tip: You’ll find the full list of ingredients and measurements in the recipe card below.)
Directions
- Prepare the Wafer Layers:
- If you’re using large wafer cookies, break them into smaller pieces or use wafer sticks. Arrange the pieces in a rectangular or square shape on a baking sheet lined with parchment paper.
- Melt the Chocolate:
- In a heatproof bowl, combine the chocolate chips, peanut butter (if using), and vegetable oil.
- Microwave the mixture in 20-30 second intervals, stirring in between until completely melted and smooth. If you prefer, you can melt the chocolate using a double boiler on the stovetop.
- Assemble the Bars:
- Pour half of the melted chocolate evenly over the wafer layers, ensuring the layers are well coated.
- Place the tray in the refrigerator for 15-20 minutes to let the chocolate set.
- Add the Second Layer:
- Once the first layer of chocolate has set, pour the remaining melted chocolate over the wafer layers to completely cover them.
- Smooth the chocolate with a spatula to ensure even coverage.
- Set the Bars:
- Refrigerate the bars for at least 1 hour or until the chocolate is firm and set. If you’re in a hurry, you can place them in the freezer for 30 minutes.
- Cut and Serve:
- Once the chocolate is fully set, remove the bars from the refrigerator. Using a sharp knife, cut them into bar-sized pieces.
- Serve immediately or store them in an airtight container.
Servings and Timing
This recipe makes about 12-15 homemade Kit Kat bars, depending on how big you cut them. It takes about 20 minutes to prepare, with an additional 1-2 hours of cooling time for the chocolate to set.
Variations
- Chocolate Type: Experiment with milk, dark, or white chocolate for different flavors.
- Peanut Butter Twist: Add a layer of peanut butter between the wafer layers for a creamy, nutty addition.
- Caramel Layer: For a caramelized treat, add a thin layer of caramel sauce before pouring the chocolate.
- Crunchy Add-ins: Add crushed nuts like almonds, peanuts, or hazelnuts into the chocolate for extra crunch.
Storage/Reheating
- Storage: Store the homemade Kit Kat bars in an airtight container at room temperature for up to 1 week, or in the refrigerator for up to 2 weeks to maintain the texture.
- Reheating: If the chocolate becomes too firm, you can re-melt it by gently warming it in the microwave or over a double boiler.
FAQs
1. Can I use a different type of chocolate?
Yes! You can use any type of chocolate—milk, dark, or white—depending on your preference. Feel free to mix them for a fun twist.
2. Can I make these bars without peanut butter?
Absolutely! Peanut butter is optional, and you can skip it if you want a more traditional flavor. The vegetable oil is enough to help the chocolate coat smoothly.
3. Can I use wafer cookies from a store-bought package?
Yes, store-bought wafers work perfectly. Just break them into pieces to match the size you want for your Kit Kat bars.
4. Can I add more layers of wafers for a thicker bar?
Yes, feel free to stack more wafer layers for a thicker bar. Just make sure to adjust the amount of chocolate accordingly to coat each layer properly.
5. Can I freeze the bars to store them?
Yes, you can freeze them for longer storage. Just place them in an airtight container or freezer bag and they’ll stay fresh for up to 3 months. Thaw at room temperature before serving.
6. How can I make the chocolate smoother?
Adding vegetable oil helps smooth out the chocolate for easy pouring and even coating. If you want a silkier texture, you can also add a little heavy cream to the chocolate.
7. Can I make a dairy-free version?
Yes, you can use dairy-free chocolate chips and substitute peanut butter for the creamy filling to make these bars dairy-free.
8. How do I prevent the chocolate from cracking?
Make sure the chocolate is fully melted and smooth before pouring over the wafers. Let each layer set before adding the next to ensure the chocolate remains smooth and doesn’t crack.
9. Can I use homemade wafers instead of store-bought?
Yes, if you prefer, you can make your own wafers. Just ensure they’re crispy and thin so they layer well and don’t overpower the chocolate.
10. Can I make these bars in advance?
Yes, these bars can be made a day or two in advance. Just store them in an airtight container at room temperature or in the refrigerator.
Conclusion
Homemade Kit Kat Bars are a fun, customizable treat that offers the same great flavor as the classic candy but with a homemade touch. The crispy wafer layers, smooth chocolate, and optional peanut butter or caramel make these bars irresistible. Whether you’re making them for a party, a gift, or just to satisfy a sweet craving, these DIY Kit Kat bars are sure to impress. Try them today for a fresh take on a nostalgic favorite!
PrintHomemade Kit Kat Bars
Homemade Kit Kat Bars are a delicious, DIY version of the classic candy, featuring layers of crispy wafer cookies and smooth chocolate coating. These bars are easy to make at home, and they’re perfect for satisfying your sweet tooth with a personal twist on the beloved treat.
- Prep Time: 20 minutes
- Cook Time: 0 minutes
- Total Time: 1 hour 30 minutes
- Yield: 12-15 bars
- Category: Dessert
- Method: No-Bake
- Cuisine: American
- Diet: Vegetarian
Ingredients
- 2 cups of milk chocolate chips (or dark chocolate, if preferred)
- 1 1/2 cups of crispy wafer cookies (you can use plain wafers or wafer sticks)
- 1/4 cup peanut butter (optional for a twist)
- 2 tbsp vegetable oil (to smooth out the chocolate)
Instructions
Prepare the Wafer Layers:
If you’re using large wafer cookies, break them into smaller pieces or use wafer sticks. Arrange the pieces in a rectangular or square shape on a baking sheet lined with parchment paper.
- Melt the Chocolate:
In a heatproof bowl, combine the chocolate chips, peanut butter (if using), and vegetable oil.
Microwave the mixture in 20-30 second intervals, stirring in between until completely melted and smooth. If you prefer, you can melt the chocolate using a double boiler on the stovetop. - Assemble the Bars:
Pour half of the melted chocolate evenly over the wafer layers, ensuring the layers are well coated.
Place the tray in the refrigerator for 15-20 minutes to let the chocolate set. - Add the Second Layer:
Once the first layer of chocolate has set, pour the remaining melted chocolate over the wafer layers to completely cover them.
Smooth the chocolate with a spatula to ensure even coverage. - Set the Bars:
Refrigerate the bars for at least 1 hour or until the chocolate is firm and set. If you’re in a hurry, you can place them in the freezer for 30 minutes. - Cut and Serve:
Once the chocolate is fully set, remove the bars from the refrigerator. Using a sharp knife, cut them into bar-sized pieces.
Serve immediately or store them in an airtight container.
Notes
- For a chocolate twist, add chocolate chips to the banana batter or swap vanilla pudding for chocolate pudding.
- Banana slices can be added to the pudding filling for extra flavor.
- For a fun, adult version, add a tablespoon of rum to the pudding mixture.
Nutrition
- Serving Size: 1 bar
- Calories: 230
- Sugar: 18g
- Sodium: 50mg
- Fat: 14g
- Saturated Fat: 7g
- Unsaturated Fat: 6g
- Trans Fat: 0g
- Carbohydrates: 24g
- Fiber: 1g
- Protein: 3g
- Cholesterol: 15mg


