Why You’ll Love This Recipe
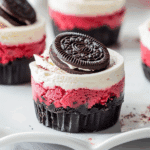
If you’re a fan of cheesecake and red velvet cake, this recipe brings the best of both worlds together. The no-bake nature of these mini cheesecakes makes them a quick and easy dessert, and the addition of Oreos gives a fun, crunchy texture that contrasts beautifully with the creamy filling. The red velvet layer adds a pop of color, making them ideal for special occasions like Valentine’s Day, Christmas, or birthdays. These mini cheesecakes are a guaranteed hit and are as simple to make as they are impressive to serve.
Ingredients
For the crust:
- 16 Oreo cookies, crushed
- 2 tablespoons butter, melted
For the cheesecake filling:
- 2 cups cream cheese, softened
- 1 cup powdered sugar
- 1 teaspoon vanilla extract
- 1/4 cup sour cream
- 1/4 cup heavy whipping cream
- 2 tablespoons cocoa powder
- 2 tablespoons red velvet cake mix (dry)
- Red food coloring (optional)
(Tip: You’ll find the full list of ingredients and measurements in the recipe card below.)
Directions
- Prepare the crust:
- In a food processor, crush the Oreo cookies until fine crumbs form.
- Add the melted butter and pulse until the mixture is combined.
- Spoon about 1 tablespoon of the Oreo mixture into each cupcake liner and press down gently to form a solid crust. Set aside in the freezer to chill while you prepare the filling.
- Make the cheesecake filling:
- In a large bowl, beat the softened cream cheese with an electric mixer until smooth and creamy.
- Add the powdered sugar, vanilla extract, sour cream, cocoa powder, and red velvet cake mix (and food coloring if desired) to the cream cheese mixture. Beat until well combined.
- In a separate bowl, beat the heavy whipping cream until stiff peaks form. Gently fold the whipped cream into the cream cheese mixture until smooth and fluffy.
- Assemble the mini cheesecakes:
- Spoon the cheesecake mixture into each cupcake liner, filling it to the top. Smooth the top with a spatula.
- Place the mini cheesecakes back in the fridge and allow them to chill for at least 4 hours, or overnight for best results.
- Serve:
- Once chilled and set, remove the cheesecakes from the cupcake liners and serve. Garnish with a whole Oreo cookie on top or some whipped cream if desired.
Servings and Timing
- Servings: 12 mini cheesecakes
- Total time: 20 minutes of preparation, plus 4 hours to chill
- Active time: 20 minutes
Variations
- Flavor options: If you prefer a different flavor, you can swap out the red velvet cake mix for chocolate cake mix or even vanilla for a lighter color.
- Toppings: Add festive toppings like crushed Oreo crumbs, sprinkles, or even a drizzle of chocolate or caramel sauce to dress up the cheesecakes.
- Vegan version: Substitute the cream cheese with a vegan cream cheese alternative and use dairy-free whipped cream and Oreos for a plant-based version.
Storage/Reheating
- Storage: Store the mini cheesecakes in an airtight container in the fridge for up to 5 days.
- Freezing: You can also freeze these cheesecakes for up to 1 month. Thaw them in the fridge before serving.
FAQs
Can I use a different cookie for the crust?
Yes, you can use any cookie you like for the crust. Graham crackers, chocolate chip cookies, or even gingerbread cookies would work well as alternatives.
How do I make sure the mini cheesecakes are set properly?
To ensure they set correctly, let the cheesecakes chill in the fridge for at least 4 hours, or preferably overnight. This allows the filling to firm up perfectly.
Can I use light cream cheese or reduced-fat options?
Yes, you can substitute light cream cheese, but the texture and richness of the cheesecake may be slightly different.
Can I make these ahead of time?
Yes, these mini cheesecakes are perfect for making ahead. In fact, they taste even better after they’ve had time to chill for several hours or overnight.
What can I use instead of sour cream?
You can substitute sour cream with Greek yogurt for a similar texture and tangy flavor.
Can I make a full-sized cheesecake instead of mini ones?
Yes, you can use a springform pan to make a full-sized cheesecake. Just adjust the chilling time as needed.
How long do these mini cheesecakes last in the fridge?
These mini cheesecakes will last up to 5 days in the refrigerator when stored in an airtight container.
Can I add a layer of red velvet cake in the mini cheesecakes?
Yes, you can layer a thin layer of baked red velvet cake at the bottom of each cheesecake if you’d like to make them more similar to a traditional red velvet cake.
How can I make these gluten-free?
To make these mini cheesecakes gluten-free, use gluten-free Oreos or another gluten-free cookie for the crust.
Can I freeze these mini cheesecakes?
Yes, you can freeze these mini cheesecakes for up to 1 month. Thaw them in the refrigerator before serving.
Conclusion
No-Bake Mini Red Velvet Oreo Cheesecakes are a stunning and delicious dessert that’s perfect for any celebration or casual gathering. Their rich, creamy texture, combined with the sweet crunch of Oreos and the festive red velvet flavor, makes them a crowd-pleaser every time. With simple ingredients and minimal effort, you can create these beautiful individual cheesecakes that are sure to impress.
PrintNo-Bake Mini Red Velvet Oreo Cheesecakes
These No-Bake Mini Red Velvet Oreo Cheesecakes combine creamy cheesecake with the crunch of Oreos and the festive touch of red velvet, perfect for any occasion.
- Prep Time: 20 minutes
- Cook Time: 0 minutes
- Total Time: 4 hours 20 minutes
- Yield: 12 mini cheesecakes
- Category: Dessert
- Method: No-Bake
- Cuisine: American
- Diet: Vegetarian
Ingredients
- 16 Oreo cookies, crushed
- 2 tablespoons butter, melted
- 2 cups cream cheese, softened
- 1 cup powdered sugar
- 1 teaspoon vanilla extract
- 1/4 cup sour cream
- 1/4 cup heavy whipping cream
- 2 tablespoons cocoa powder
- 2 tablespoons red velvet cake mix (dry)
- Red food coloring (optional)
Instructions
Prepare the crust: In a food processor, crush the Oreo cookies until fine crumbs form. Add the melted butter and pulse until the mixture is combined. Spoon about 1 tablespoon of the Oreo mixture into each cupcake liner and press down gently to form a solid crust. Set aside in the freezer to chill while you prepare the filling.
- Make the cheesecake filling: In a large bowl, beat the softened cream cheese with an electric mixer until smooth and creamy. Add the powdered sugar, vanilla extract, sour cream, cocoa powder, and red velvet cake mix (and food coloring if desired) to the cream cheese mixture. Beat until well combined. In a separate bowl, beat the heavy whipping cream until stiff peaks form. Gently fold the whipped cream into the cream cheese mixture until smooth and fluffy.
- Assemble the mini cheesecakes: Spoon the cheesecake mixture into each cupcake liner, filling it to the top. Smooth the top with a spatula. Place the mini cheesecakes back in the fridge and allow them to chill for at least 4 hours, or overnight for best results.
- Serve: Once chilled and set, remove the cheesecakes from the cupcake liners and serve. Garnish with a whole Oreo cookie on top or some whipped cream if desired.
Notes
- Store in an airtight container in the fridge for up to 5 days.
- Freeze for up to 1 month and thaw in the fridge before serving.
- Use gluten-free Oreos to make this recipe gluten-free.
- Feel free to swap sour cream with Greek yogurt for a tangy alternative.
- For a different flavor, substitute red velvet cake mix with chocolate or vanilla cake mix.
Nutrition
- Serving Size: 1 mini cheesecake
- Calories: 350
- Sugar: 29g
- Sodium: 150mg
- Fat: 25g
- Saturated Fat: 12g
- Unsaturated Fat: 10g
- Trans Fat: 0g
- Carbohydrates: 31g
- Fiber: 2g
- Protein: 4g
- Cholesterol: 45mg


