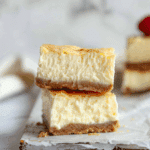
Cheesecake Bars
Creamy, tangy cheesecake bars with a buttery graham cracker crust and smooth vanilla filling — all the flavor of classic cheesecake in a simple, sliceable form that’s perfect for sharing.
- Prep Time: 20 minutes
- Cook Time: 35 minutes
- Total Time: 6 hours (including chilling)
- Yield: 16 bars
- Category: Dessert, Bars
- Method: Baking
- Cuisine: American
- Diet: Vegetarian
Ingredients
- 1 1/2 cups graham cracker crumbs (or cookie crumbs)
- 2 tbsp brown sugar (optional)
- 6 tbsp unsalted butter, melted
- 16 oz cream cheese (brick-style, full fat, softened)
- 2/3 cup granulated sugar
- 1/3 cup sour cream (or Greek yogurt or heavy cream)
- 2 large eggs
- 1 1/2 tsp vanilla extract
- 1 tbsp lemon juice (and/or 1 tsp zest)
- 1 tbsp all-purpose flour (optional, for stability)
- Pinch of salt
- Optional toppings: chocolate ganache, fruit compote, caramel drizzle, or fresh fruit
Instructions
- Preheat oven to 325°F (165°C). Line an 8×8-inch baking pan with parchment paper, leaving an overhang for easy removal.
- In a bowl, mix graham cracker crumbs, brown sugar (if using), and melted butter until evenly moistened. Press firmly into the pan to form the crust. Bake for 8–10 minutes, then let cool slightly.
- In a large bowl, beat softened cream cheese until smooth and lump-free. Add sugar and a pinch of salt, mixing until creamy.
- Mix in sour cream, vanilla extract, lemon juice, and flour (if using). Add eggs one at a time, mixing just until combined—avoid overbeating.
- Pour filling over the cooled crust and smooth the top. If desired, swirl in fruit jam or melted chocolate for a marbled effect.
- Bake for 25–40 minutes, until edges are set but the center slightly jiggles. Do not overbake; it will continue setting as it cools.
- Cool the pan on a rack to room temperature, then refrigerate for at least 4–6 hours or overnight until fully chilled.
- Lift the cheesecake from the pan using the parchment overhang, slice into bars, and serve chilled. Add toppings or drizzle if desired.
Notes
- Use full-fat brick cream cheese for best texture.
- Do not overmix or overbake to avoid cracks.
- Chill thoroughly before slicing for clean edges.
- For gluten-free bars, use gluten-free crumbs for the crust.
- These bars taste even better after a night in the fridge.
Nutrition
- Serving Size: 1 bar
- Calories: 230
- Sugar: 15g
- Sodium: 150mg
- Fat: 16g
- Saturated Fat: 9g
- Unsaturated Fat: 6g
- Trans Fat: 0g
- Carbohydrates: 18g
- Fiber: 0g
- Protein: 4g
- Cholesterol: 65mg
Find it online: https://thefamilycooking.com/cheesecake-bars/

